|
Rock Climbing Equipment |
|
|||||||||||||||||||||||||||||||||
|
We provide all technical gear such as climbing ropes, harnesses and helmets. We can also provide klettersacks (packs for climbing), fanny packs, and rock shoes for your use during our day-long programs. You are always welcome to use your own gear, as long as it is suitable and in good condition. For our overnight trips, we provide all group gear such as tents, stoves, cook sets and emergency equipment; you will need to provide your own sleeping bag, pad and pack. Participants must provide appropriate clothing. In some mountain environments, clothing can be as important to your comfort and safety as a rope. Please pay careful attention to our suggestions. Please visit our Equipment page for an in-depth discussion of technical clothing. Included are topics on: heat and moisture management, outdoor fabrics, fit considerations for clothing and footwear, purchasing suggestions, and much more. If you are not very familiar with specialized outdoor clothing we suggest you carefully review this page. |
|
|||||||||||||||||||||||||||||||||
|
In the list below, we have tried to give you a range of choices to help guide you in the acquisition of equipment. There is no one “best way” to outfit yourself and cost certainly should enter into your purchase decisions. Our opinions regarding the best equipment for any given purpose are based upon our experience using the equipment extensively in the Adirondacks. When we travel away from this area the equipment we take is sometimes different. If you have any questions please don't hesitate to contact us. What To Wear Pants Insulating Layer Rain Gear Personal Accessories |
||||||||||||||||||||||||||||||||||
|
Footwear The information below may help you understand the many footwear options available for climbers. Please feel free to contact us if you need help with footwear – everyone’s needs are a bit different. |
|
|||||||||||||||||||||||||||||||||
|
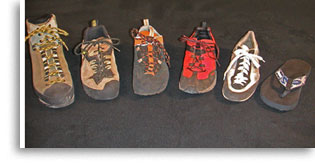
The photo above illustrates some of R.L.’s approach shoes. Most of these models are no longer available and your foot might not fit them anyway – so think of each as representing a category of shoe, rather then a specific model. Shoes are selected according to the approach situation expected and, in some cases, they can be used for the climb too. By the way, there are far more shoes shown here than most people need! Far Left – La Sportiva Trango Light 2nd From Left – La Sportiva El Cap 3rd From Left – Kayland Vertigo 3rd From Right – La Sportiva Superfly 2nd From Right – Boreal Flyer Far Right – Flip-flops Not Illustrated – Sneakers (running shoes, tennis shoes, etc.) |
||||||||||||||||||||||||||||||||||
|
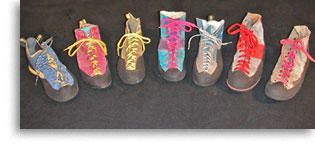
This photo illustrates some of R.L.’s active rock climbing footwear. You will notice many of his shoes are made by La Sportiva. That is because they fit his feet very well. Although La Sportiva makes a wide selection of superb shoes, their shape will not fit all feet. Your feet should determine the brand of shoes you buy – don’t be influenced by what other people wear! |
|
|||||||||||||||||||||||||||||||||
|
All of the shoes illustrated and described are suitable for long, traditional rock climbs. Today, most rock shoes are designed for short outdoor climbs and indoor climbing. Climbers can remove shoes frequently in these environments so this type of shoe may sacrifice comfort in the interest of performance. Remove your shoes often on a big climb and you’ll slow down so much you may end up removing them for the night – while you bivouac! Far Left – La Sportiva Rock Jock 2nd From Left – La Sportiva Enduro 3rd From Left – La Sportiva Kaukulator Middle – La Sportiva Mariacher (sold by Merrell) 3rd From Right – La Sportiva Mega 2nd From Right – Boreal Big Wall Far Right – Boreal Firé |
||||||||||||||||||||||||||||||||||
|
Rock Climbing Shoes: Selecting, Fitting & Resoling Before you even go anywhere near a pair of rock shoes you should realize that the fit of a climbing shoe far outweighs its other attributes such as design, weight, rubber, and even price. Forget the reviews in the magazines; let your feet tell you what to buy! You should also realize that most serious climbers eventually end up owning at least two pairs (usually more) of shoes – each for a particular purpose. For now, the only shoes to consider are the “general purpose” models. Contrary to advice you may receive, your first pair should be relatively comfortable (not bedroom slippers, but definitely painless). Also, there are many good deals to be had by mail-ordering climbing equipment, but shoes are not one of them. The best you’ll ever get is shoes that seem to fit because sending them back is more of a bother than accepting them as they are. Even if you’ve tried on many shoes in a shop, and think you know your exact size, rock shoes are notoriously inconsistent and you may find your size in the shop is not your size elsewhere. We’ve divided the fit of a climbing shoe into three categories. Most serious climbers own a pair of shoes from each category, sometimes several pairs. In general, a tighter fit gives better the performance and less comfort. It is important to remember that a shoe that fits the shape of your foot well can out-perform a tighter one that is shaped poorly for your foot. COMFORTABLE: The tips of your toes barely touch the front of the shoe and, although you wouldn’t wear the shoes for dancing, you could wear them all day long and even while walking down a descent trail (with some discomfort) at the end of the day. Fit and comfort are definitely improved by socks. A good choice for most long climbs up to about 5.8 difficulty (harder if your techniques is good). We wear this type of shoe whenever we think we can get away with it, which is most of the time. SNUG: The tips of your toes definitely touch the end of the shoe but they are not bent. Your foot feels almost like someone wrapped it with an elastic bandage; tight everywhere but without any painful pressure points. You may want to take your shoes off at the top of a long climb, but only after several hours of climbing. Walking down from a climb in these shoes would be quite uncomfortable, but not impossible. Socks will sometimes improve fit and comfort of shoes in this category. Ideal for most routes from 5.7 through 5.10 UNCOMFORTABLY TIGHT: You simply couldn’t get your foot into anything much smaller. Walking is decidedly uncomfortable and your feet feel like the circulation is being cut off. If there are significant pressure points in a shoe this tight you won’t be able to wear it at all. You’ll definitely want to take your shoes off at belay ledges and the thought of walking down from a climb in them is nightmare material. Socks will get in the way of a good fit here. For difficult (5.11 and above) climbs, the added control of shoes this tight can make a difference, but for easier climbs the discomfort is simply not worth the negligible increase in performance. Fitting Your First Pair Of Rock Shoes 1) You are looking for a comfortable to snug fit in a shoe that is shaped appropriately for your foot. Don't be swayed by people who tell you shoes have to be super-tight to be useful. This is simply not true until you are an expert (and then it is only true on certain types of climbs) and you’ll wear out several pairs of shoes before you can really appreciate the difference a tight shoe makes. Why be unnecessarily uncomfortable during the process? Also, keep in mind that stretch in modern rock shoes is minimal. They don’t break-in so plan on the shoes changing very little over time. DON’T BUY YOUR SHOES TOO SMALL! 2) Find a shop with a stock of at least two different models of “general purpose” shoes in your size range. Shoes in this category will offer good support (for a rock shoe) and a design that leans more toward comfort than performance. 3) Before fitting your shoes, trim your toe nails short and get a pair of lightweight socks, preferably cotton. We like the specialized rock climbing socks with no seam over the toes to cause discomfort. 4) Without lacing the shoes, stand in several different-size pairs of each model until you find the size where your all of your toes are touching the front of the shoe, but they are not bent. This approach will allow you to determine the correct length for each model. Don't pay any attention whatsoever to the sizes marked on the boxes other than to find relative size differences. It is not uncommon to have a perfect fit in each of two shoes that are marked several sizes apart. This process will leave you with one “best” fit for each model or a total of two “finalists”. We also suggest you avoid looking at the price at this point. 5) This is where you determine the width (or more precisely the shape) of the shoe. Lace up one pair of the shoes and wander around the store for five minutes. The laces should be near the middle of their range; if there is little room to tighten them the shoe is too wide and if your foot causes them to open widely over the tongue area the shoe is too narrow. The shoes should be tight, but not unbearable. Pay attention to pressure points, especially over the toes; they usually won’t go away. Find an edge to stand on and, with weight on it, manipulate your foot into as many positions as you can. You’re not trying on street shoes so don’t expect that kind of comfort, but remember you will need to wear the shoes for several hours at a time so pay particular attention to positions that are uncomfortable. 6) Now repeat the process with the other “finalist” shoes. You are looking for the shoe that gives you the best balance between snugness and comfort. If there is a clear winner that is the shoe to buy. If not, try to narrow the selection down by putting a different model on each foot at the same time. This side-by-side comparison often ends the confusion. 7) If there are no major fit differences between models you'll probably want to take into consideration such factors as price, color, and other minor differences. Usually fit will clearly be the deciding factor. Resoling & Repairing Rock Shoes (and other climbing footwear) Equipment For Following Climbing Harness Belay Device Locking Carabiners (2) Nut Tool Non-Locking Carabiners (2) Long & Short Prusik Loops Cleaning Sling Chalk Bag Helmet Klettersack Lightweight Wind/Rain Pullover Suggested Reading We maintain a small selection of books available for sale, including this one. |
||||||||||||||||||||||||||||||||||
|
~ Mountain Adventures In the Adirondacks Since 1985 ~ |
|||
|
Alpine Adventures, Inc. |
(518) 576-9881 |
||


